Background
I am a huge fan of
Synology products. I started with an
ioSafe disaster-proof NAS powered by Synology. I bought it because I had a very typical NAS use case: I had some very important data that I wanted to safely store and make accessible via my network. And my ioSafe NAS is amazing at doing that job for me! However, once I got it, I realized it is so much more than just network-attached storage, it's an awesome little server that does a ton of great things for me.
But this post isn't about working with Synology NAS devices, it's about working with Synology routers. So moving on to routers: I've been through a bunch over the years. Quite some time back, I was all about installing DD-WRT onto Linksys routers because DD-WRT allowed the hardware to do so much more than the native firmware and that was useful to me. But when Synology announced they would be releasing their first router, the now-discontinued RT1900ac, I was interested in checking it out and I eagerly snapped it up as soon as it was available. And I loved it, and so when they released their next-generation router, the RT2600ac, I got it as soon as it was available, and I migrated to it from the RT1900ac to get even better range and performance.
One of the great things about Synology's management software for their NAS devices and their routers is that they let you create your own administrator account and give it any user name. This is huge because it means you can disable the default administrator account, which is a security best practice (if an attacker trying to login to a system has to guess at not only the account password but also the account user name, it's that much harder for that attacker to gain access to that system).
You can create a new administrator account on a Synology router using SRM (Synology Router Manager, the GUI for administrating Synology routers) during initial setup of the router. In fact, I believe you actually must set up a new administrator account during initial setup of the router; it's really great that they implemented it that way (though if I'm remembering correctly, it's still up to you to go disable the default administrator account). However, when I started with Synology routers, it didn't work that way: I don't believe that I even had the option to create an administrator account during setup and I certainly wasn't required to do it.
So for all these years that I've had these routers, I have been using the default administrator account. But recently, someone with IP addresses in Russia tried to gain unauthorized access to my Synology NAS (fortunately, they were unsuccessful), and thereafter I decided I needed to step up my security game. There were several measures I took, and one of them was to create a new account, add that account to the administrators group, and then disable the default administrator account on my router as well as on my NAS.
Creating a new account is easy in SRM as well as in DSM (DiskStation Manager, the GUI for administrating Synology NAS devices). Disabling an account (in this case, the default administrator account) is also easy in both SRM and DSM. However, administrating groups, while easy in DSM, is not functionality provided in SRM, which created a major snag in my plan. I was able to work around it by utilizing SSH, and that's what I will show you how to do here. As well as I can tell, no one else has both figured out how to do this process and commented about it on the web and that meant I had to dig in and figure it out, which was a time-consuming process, and I'm writing this in the hopes it can help you get it done a lot faster.
So let's get started!
The steps
-
Create a backup of your router's configuration settings. If something goes sideways here, you're going to want to have a backup of your router's configuration settings. If you need more information on how to do this, check out this SRM Help Article.
-
Create the account you want to add to the administrators group. That is to say, create your new administrator account, only it won't be an administrator account when you create it, it will just be a regular user account. But you have to create it and then after you create it, you'll be able to add it to the administrators group. Note that it's possible to create a new account via SSH, but since it's easy in SRM, I recommend you go the SRM route, but it's your call.
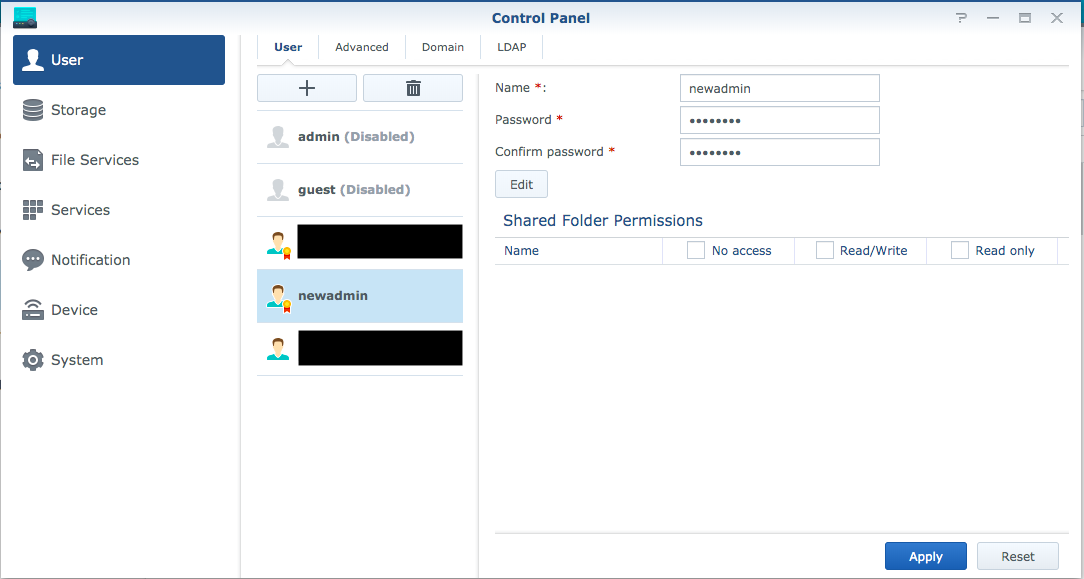
To create a new account in SRM, launch Control Panel, choose User from the menu on the left, press the + button above the list of users, and then fill in the user form (provide values for Name, Password, and Confirm password) as shown in the following screenshot. It goes without saying (but I'll say it anyway) that the Password and Confirm password values need to be the same. But an important note: it's best if the Name value does not include spaces because if you include spaces, the SSH commands in the following steps won't work as written.
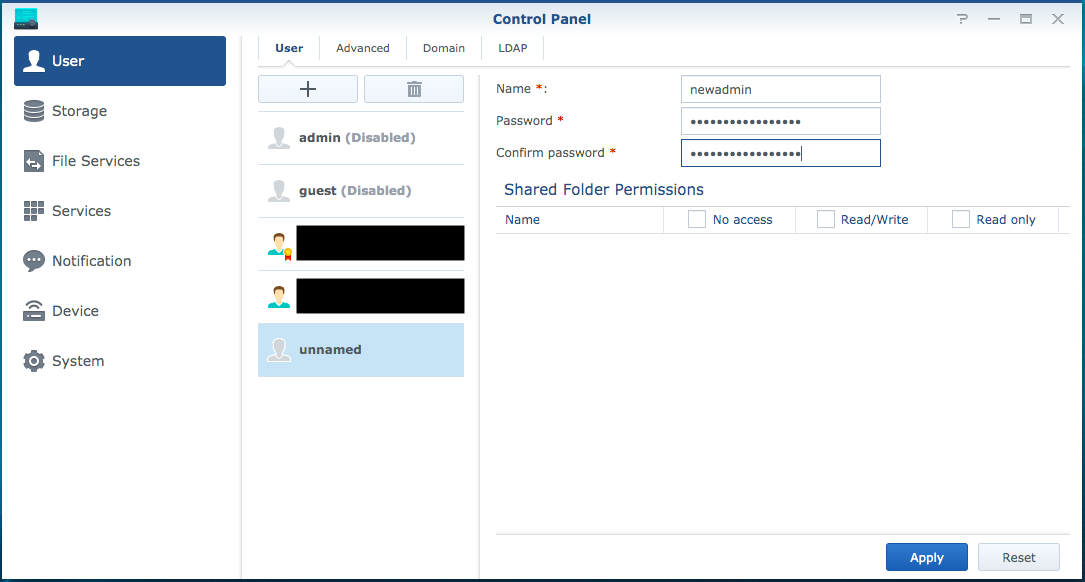
Note that I'm using newadmin for the value of Name, but you'll want to instead use the value you want to use for your new administrator account. Also note that in this and many of the screenshots that follow, I have redacted the user name of accounts I have created on my router.
When you have filled in the user form, press the Apply button and your new account will be created as shown in the following screenshot.
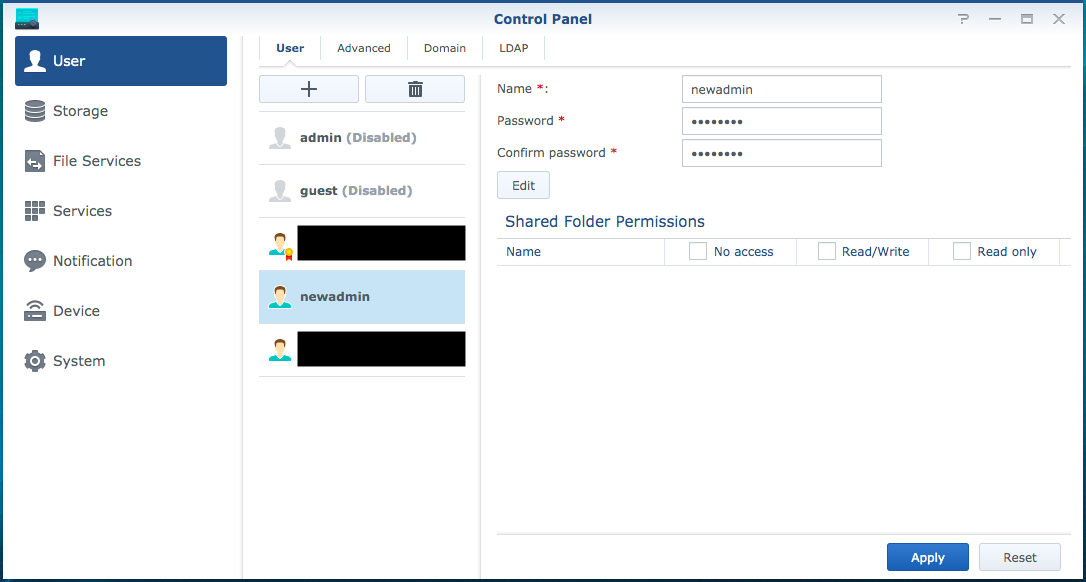
You will notice that the new account does not bear the little gold medal with a red ribbon on the user icon like the default administrator account does, which means that the account is not at this time part of the administrators group (adding it to the administrators group is what we'll do next using SSH). Note that I have already gone through and created a new account and added it to the administrators group, so what I'm doing for this exercise is creating yet another account and adding it to the administrators group; as such, there are a couple of differences in my screenshot and what you'll see: the little gold medal with a red ribbon on the user icon isn't showing on the default administrator account because I've disabled that account, but you can see that it is showing on my actual new administrator account (the user name of which I have redacted in the screenshot).
It's a good idea to press the Edit button to for your new account and then, in the dialog that appears, enter in a Description and Email for the new user (and then when you're done you'll of course need to press the OK button to save those changes).
-
Enable SSH. Login to SRM using your default administrator account, launch Control Panel, choose Services from the menu on the left, and then choose the System Services section at the top. You'll see the first portion of the page is Terminal and the first option listed is a checkbox labeled Enable SSH service; you want to check this box (you can leave the port at the default value of 22) then press the Apply button at the bottom of the page.
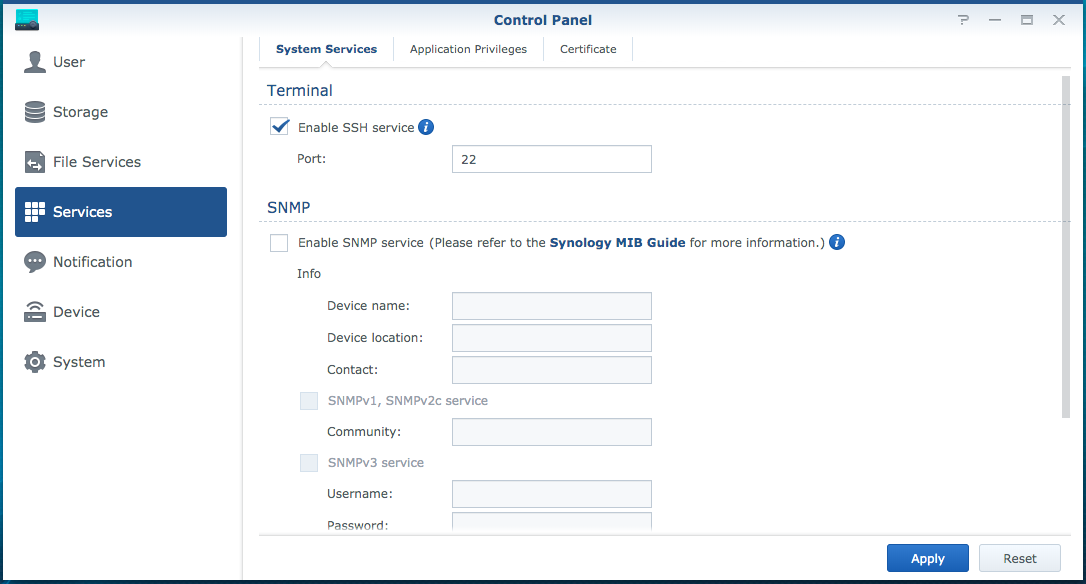
You will then most likely get a Firewall Notification dialog asking if you want to allow Internet access to SSH; for purposes of what we're doing here, you definitely do not want this as this creates a potential attack vector for those who may wish to compromise your router. So simply hit the Cancel button.

Remember what you did here because in the final step you're going to come back here and uncheck this box and apply that change. Even if you found that SSH was already on, I recommend you come back and disable it at the end of this process unless you have a known need to have it enabled as this will preclude any potential security concerns.
-
Launch your SSH client. If you're on Windows, I'm going to leave this to you to research for yourself how to do this. If you're on a Mac, you simply need to launch Terminal. If you're reading this post and you're a Mac user, you most likely already know how to launch Terminal, but if you don't, check out this information.
-
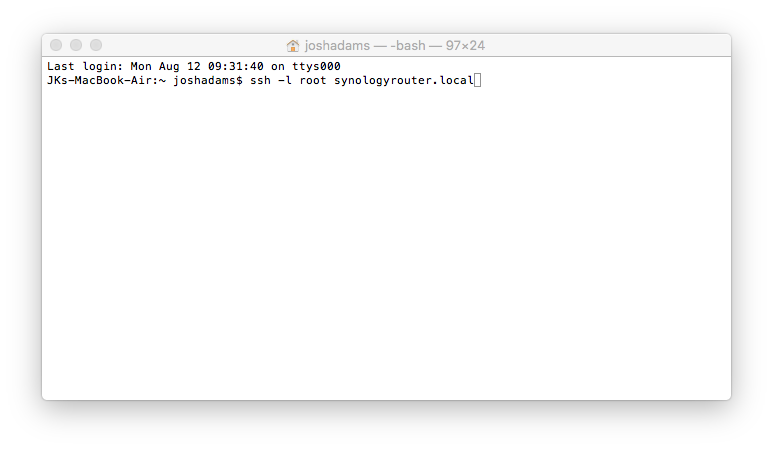
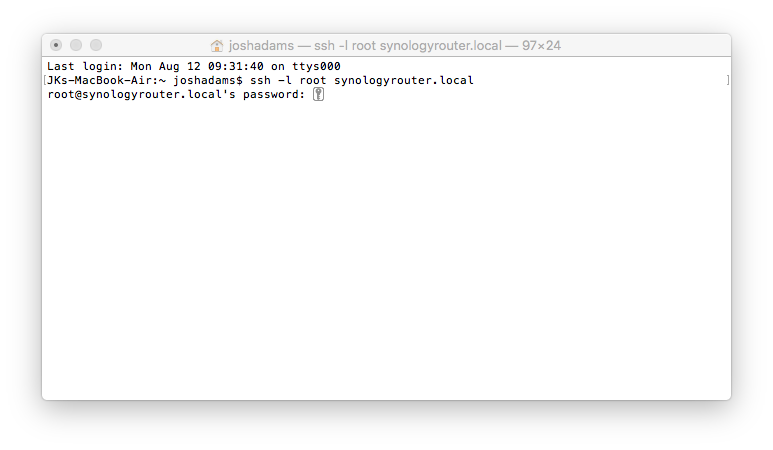
SSH into your Synology router as the root account. On a Mac using Terminal, this is the command you need to use:
ssh -l root xxx.xxx.xxx.xxx
Where you replace xxx.xxx.xxx.xxx with the IP address of your router (you will see that in the screenshots that follow I utilize synologyrouter.local instead of the router's IP address; if you want utilize that approach, you'll need to use xxx.local where xxx is whatever name you have listed for your router in Control Panel → System → SRM Settings). The command to use might vary slightly with another SSH client.
-
Enter the password for your default administrator account then press the return/enter key. In Terminal (I can't speak for other SSH clients), the keystrokes for your password won't be reflected on the screen in any way until you have fully typed in the password and pressed the return/enter key. By the way, you're actually entering the password for the root account here, but on Synology routers the password for the root account is the same as the password for the default administrator account. Note that even after you have disabled your default administrator account, the password for the root account continues to be the same as the password for the default administrator account.
-
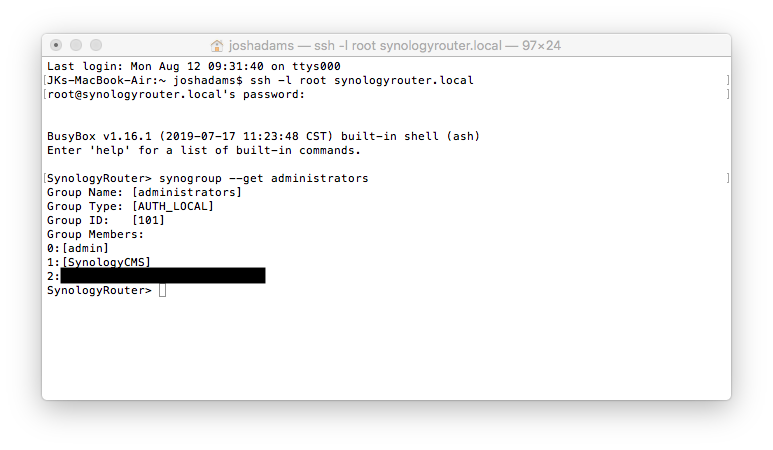
Retrieve the current members of the administrators group. Don't overlook this step!!! Ideally, you'd be able to simply add the account you created in step 2 to the administrators group, but that's not possible; rather, when you're modifying the membership of a group, you have to specify all of the accounts you want to be members of the group. So that is to say when you're modifying the membership of a group, it's always a complete overwrite of the existing membership of the group. Therefore, before making any changes to the membership of a group, you need to know what users are currently in the administrators group so that you can specify them, along with the account you created in step 2, as the members of the group. Okay, with that, here's the command to use:
synogroup --get administrators

After you enter this command and press the return/enter key, you get a listing of information about the administrators group, including its current members, as shown in the following screenshot. As I mentioned previously, I have already gone through and created a new account and added it to the administrators group, so what I'm doing for this exercise is creating yet another account and adding it to the administrators group, and accordingly my administrators group already shows my new administrator account (I've redacted the user name of this administrator account in the screenshot), but I expect yours will only show admin and SynologyCMS. But regardless of exactly what accounts are shown as members of the administrators group, I recommend that you keep them all as members of the administrators group going forward (meaning you include them all in the command you'll type in the next step).
-
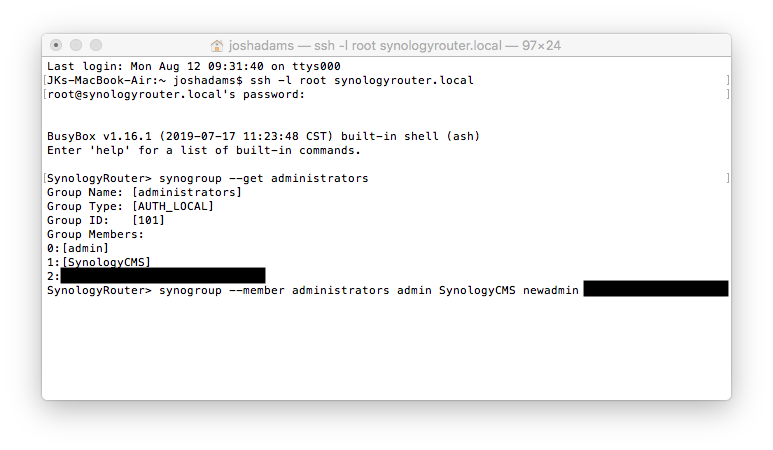
Write all the members of the administrators group. That verb "write" may sound a little wonky, but I can't stress enough that what you're doing in this step is overwriting the existing membership of the administrators group with the new membership you're specifying in this step. If you mess this up, it could be very bad for you (and this is why step 1 here was to create a backup of your router's configuration settings). You must specify each and every member of the administrators group in this single command. Here's the command:
synogroup --member administrators admin SynologyCMS newadmin
So in the synogroup --member administrators part, you're specifying that you're writing the members of the administrators group and then after that you're including each of the accounts you want to be a part of the administrators group. You can see in the screenshot below that I'm specifying all of the accounts returned from the command in the previous step and I'm adding in newadmin, which is the name of the new account I want to add to the administrators group (you of course will need to replace newadmin with whatever account you created in step 2). Again, remember that the redacted parts are my actual new administrator account so don't worry about those, you just need to list all the existing accounts that are members of the administrators group plus the account you created in step 2.
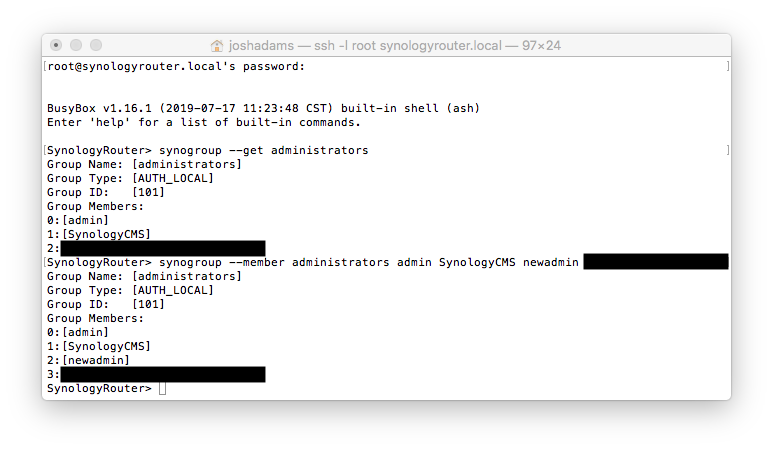
Just as was the case with the previous command, after you enter this command and press the return/enter key, you will get a listing of information about the administrators group, including its current members, as shown in the following screenshot. As I mentioned previously, I have already gone through and created a new account and added it to the administrators group, so what I'm doing for this exercise is creating yet another account and adding it to the administrators group, and accordingly my administrators group already shows my new administrator account (I've redacted the user name of this administrator account in the screenshot) but you can see that beyond that I'm showing exactly what I expect and what I want here: I have admin, SynologyCMS, and newadmin as members of the administrators group. And this is what you want to see too, except of course rather than newadmin you want the list to include whatever account you created in step 2; if that's what you see, you did it! Now it's time to check things out and clean things up.
-
Terminate the SSH connection. You might want to skip ahead to the next step and check to make sure that you're seeing the account you created in step 2 as being a member of the administrators group and then come back to this one, but I'm putting it here so that I'm not switching out of Terminal and then back into it. Anyway, all you need to do here is type this command and then hit the return/enter key:
exit
After you do that, you can also quit your SSH client as you see fit (you won't need it any longer for what we're doing here).
-
Login to SRM with the account you created in step 2 and disable the default administrator account. When you created the new account in step 2, you could login to SRM, but you didn't have administrator rights nor did you have access to everything, but now when you login to SRM with your this new account, you'll have full administrator rights and access to everything. And you can visually check to make sure you're set by launching Control Panel, choosing User from the menu on the left, and then looking to see if your new account now bears a little gold medal with a red ribbon on the user icon as shown in the following screenshot (here again I have redacted the user name of my actual new administrator account).
From the perspective of improving the security of your router, it doesn't do you any good to create a new administrator account if you don't also disable the default administrator account. Obviously you don't want to do this if you haven't successfully added the account you created in step 2 to the administrators group, so it's a good thing we just checked to make sure your new account has administrator rights, isn't it? Well, yeah, but SRM won't let you shoot yourself in the foot here: you can't disable the account with which you are logged in. But you can disable the default administrator account with your new administrator account by selecting admin in the list of accounts; then pressing the Edit button; then, in the dialog that appears, checking the Disable this account box and choosing the Immediately radio button; and then pressing the OK button to save the changes.

-
Disable SSH. See the first step where you enabled SSH and use it as a guide to disable SSH. You enabled it before with the default administrator account, now you can complete the circle by disabling it with your new administrator account.
So there you go! Pretty straightforward, but like I said, not documented in a concise manner elsewhere, so I put this together in the hopes it would help others out. If it was useful to you and you're willing to take a moment to post a comment about it, I'll appreciate that.